Pages

Sunday, April 22, 2012

Upstairs hallway wall repair

The living room and dining room were one thing. But the worst sections of the lath plaster, by far, were in the upstairs hallway. Remember when I said that the first thing Justin did when we bought the house was to knock a hole in the living room wall? Well, the second thing he did was to knock a hole in the stairwell wall.
Justin measures the area to be drywalled.

This section of the stairwell wall was bulged out really badly and had a very poorly done patch.  We tried to remove just a small section, but instead, it all came down.

Oops.

The ceiling section was also really bad but instead of taking this down, we decided to just remove the loose sections of lath, then build a lattice over it, and attach our drywall directly to that.  


The stairwell ceiling, with lattice attached, awaiting drywall.

We also removed a few additional wall areas. There was so much plaster to take down, Juniper even gave us a hand. 

Our resident handygirl.

"Take that, wall!"

Removing this area gave us the opportunity to check out the plumbing that goes to the bathroom.


The wet wall, AKA lots of plumbing

Below is the hallway wall between the bathroom and Juniper's room. We took this down so that we could complete the raceway for the 2nd floor electrical. It also gave us a good look at the chimney for the furnace.

The chimney, and space to run electrical wires.

Once everything was down and cleaned up, it was time to drywall. 

After running the electrical, Justin finishes up the hallway drywall.


Almost finished: new drywall on the stairwell ceiling, righthand wall, and wet wall.

There is still a lot of sanding to do, but at least the walls are buttoned up now!


Friday, April 20, 2012

Brigitte and Justin do the Electric Slide


And here it is folks, the SINGLE WORST thing we found in the house: outdated electricity. We had no idea it would be this bad. During the inspection, it looked as though the electrical had been upgraded fairly recently, so we didn't think we'd have to do much to it.   

Were we ever wrong! After removing the plywood from the basement ceiling, we found out just how bad it was. The wiring had indeed been replaced...but only within a 10 foot radius around the panel.

The electrical panel: it looks so innocent, doesn't it?

From there, the rest of the electrical was...knob and tube! Spliced into the new wireing simply by wirenuts and electrical tape. Many sections had additional lines patched in, which is a serious fire hazard. It all had to go. (Wondering what's so bad about knob and tube? Read about it here.)

Knob and tube wiring
 
Justin and a couple of his family members got right down to work. To make a long story short, they rewired the main panel by adding 60amp sub panel, hooked up temporarily via a 6-3 cable (to be replaced later with a conduit). This made it much easier for them to run new circuits and strip the old ones from the main panel as they went along. They also discovered a lot of unnecessary circuits, which they were then able to remove. The main panel went from being horribly overloaded to having 6 extra slots.  

The panel, after removing numerous unnecessary circuits.
Planning where to route the new circuits


They also had to figure out how to run the new circuits through the basement, then up to each floor, ending in the attic. This involved building a "raceway" for the wires, which involved taking down lath plaster.

The raceway to the second floor
Let's not even discuss the petrified squirrel Justin found under the attic floorboards, next to a big, fluffy nest that was built around some chewed up old wire that had evidence of arcing (i.e. a fire waiting to happen).

Instead, let's discuss the fact that we now have a huge pile of old copper wire, which we can trade in for some cash!

Valuable copper wire!
We also had some very important decisions to make, such as: what color do we want our outlets to be?
Why don't outlets come in blue or purple?

Brigitte discovered that sometimes, not caring about something actually makes it harder to make a decision. Which is why she deliberated for about 10 minutes before settling on ivory (the one in the middle).


Let there be light!
After making THAT difficult decision, Justin finished up the electrical by installing our new, ivory outlets and switches.


Wednesday, April 18, 2012

Ceiling goes boom


Does anyone actually like this stuff?
 A quick sidenote about ceiling tile: I hate it. Especially that 1960's interlock cellulose fiber crap (see photo above). I would rather look at bare floor joists, or really, just about anything, than that. 

The lath plaster ceiling, sans ugly tiles
So after tearing all of that out, we got a good look at the ceiling. Even if the previous owners hadn't added backer strips to support their misguided interior design statement, the plaster was too cracked to bother repairing. And we knew it was only going to get worse when those strips of wood came down.

The solution? Tear it ALL down!

There is a completely practical reason for doing this too. We need to build a "race way" for the second floor electrical (more on that later). Now, a word of caution to anyone else who owns an old house, or is considering buying an old house: there are probably cleaner, more efficient ways to remove lath plaster from a ceiling than the "Ladder and Hammer" method pictured below. But none that I've ever been taught. So if you do decide to rip out a ceiling, you'd best be prepared for an ungodly mess. 

Justin demonstrates the "Ladder and Hammer" ceiling removal technique.

What a mess!

I hope the photographer is wearing a respirator! (she was)
As if THAT weren't enough of a mess, we then hit the blown-in cellulose insulation. That was a really happy surprise.

Cellulose insulation comes raining down.

About halfway through the tear-down.

Mission accomplished! Ah, what lovely floor joists!


Saturday, April 14, 2012

Scrape, scrape, scrape that wallpaper


The previous owners of this house had an...interesting sense of style. The dining room had this purple and white striped wallpaper in one area and beige striped wallpaper in another. The entire lower wall was sponge painted with two shades of purple, topped with cheap wood trim to give it the look of wainscotting. 

When we removed the trim, we found leftovers from earlier wallpaper.

The first order of business was to take down all the trim (the good stuff that we are keeping), remove the wallpaper, and scrape off bad areas of paint. That way, we'll be able to tell what parts of the lathe plaster need to be fixed, and what parts need to be removed completely. 


We've got our Shop Vac and mudding supplies all ready to go!
We certainly had our work cut out for us. You can also see in the above photo the oh-so-gorgeous paint job in the living room (which happened to be done OVER wallpaper, so it was doubly difficult to remove), along with the poorly-constructed "built-in" bookcases that we will be removing and replacing.


Halfway done removing the wallpaper

After hours of spraying and scraping, the wallpaper is gone. The ceiling tiles are, too, but that's another post. 
The walls after we were finished scraping the paint and patching the lathe

After removing the wallpaper, we discovered that a lot of the paint was flaking off the wall. This was because the top layer of paint was incompatible with the layer underneath, which kept it from adhering properly. So we had to spend MORE hours scraping off the paint to avoid problems when we repainted the walls. Because this was more than likely lead paint, we had to take some precautions: we wore Tivex suits and respirators while we worked, covered exposed surfaces with plastic, and cleaned up thoroughly with our shop vac, outfitted with a  HEPA filter (even though most if not all of the paint was caught by the plastic).

Tivex suits are incredibly fashionable. 


Thursday, April 12, 2012

Fun with (wallpaper) strippers

The living room, before we got our hands on it
Wallpaper doesn't seem like such a bad idea...until you have to take it down. Especially when you have to take down someone else's wallpaper. Which has been painted over. In a really ugly sponge-paint style, no less.

The trim has been taken down, and the walls are ready to be rid of their ugly wallpaper!
  Scraping off painted-over wallpaper really sucks, because the paint effectively seals the paper. This means that steam cannot penetrate it (which we learned the hard way), and wallpaper stripper isn't much better.  

 In a room full of shredded wallpaper, Justin preps the sprayer of wallpaper stripper
We did find that using a wallpaper perforator created enough space for the stripper to soak in, but even still, we had to do two rounds of spraying and scraping: once to get the outer layer down, and a second time to get the backing down. 

Justin sprays down the wallpaper with stripper

Because we were using so much stripper, we quickly realized we'd need several gallons of it, instead of just a squirt bottle. So we mixed up some concentrate in a big pump sprayer. This not only lasted a lot longer, it made it a lot easier to spray large areas of the wall all at once.

 
Brigitte gets excited about having to scrape wallpaper...again

Despite Brigitte's feigned excitement, we all got tired of the tedious job pretty quickly. And yes, we did sometimes use scrapers as pictured above, but mostly we used long-handled razor scrapers (sharp blade=much easier job).   

Almost finished! The cream color is the remaining wallpaper backing, the blue is the wall.

Hallway wallpaper, ready to be removed
 We also had to remove the hallway wallpaper on the first floor, going up the stairs, and on the second floor. There were a lot of little, oddly shaped areas here, which made it challenging.

Wallpaper scraped off the hallway walls
Brigitte's perch for the day: atop a ladder in the hallway. Scraping. 
Old layers of paint revealed


Wednesday, April 11, 2012

Tearing out ugly carpet

Juniper disapproves of the carpeting
On the whole, our house is beautiful. It has great woodwork, nice big windows, and spacious rooms. But there are some details, like the wallpaper, that we could do without. Add to that list this awful runner carpeting the stairs and upper hallway, held down with curtain rods. 

The carpet...the wallpaper...it's all too much! 
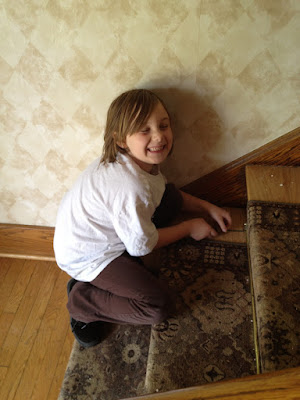
Luckily, this fix is so easy, Junie can do it. So together, Juniper and Brigitte unscrewed the curtain rods and tore out the carpet once and for all. 

Juniper is happy to help remove the ugly carpeting


Ahh, look at the beautiful wood that was hidden!


Much better, don't you think? 

Next up: wallpaper removal!